I write this blog in order to expand upon the ideas presented in my book Chess Structures – a Grandmaster Guide, published this year by Quality Chess. I follow the games of the elite on a daily basis, often looking for new instructive examples and structure-related concepts worth sharing with my readers.
After a very long absence from this website (school work and new writing projects), I have decided to get back into blogging. As some of you may have noticed, I started publishing my blog within chess.com (publishing chess boards with them is so much easier). This post was published in my chess.com blog about 8 months ago, but I never got around to posting it here. For those of you who haven’t seen it, here it is. For those of you who have, I will be posting my 9th post tomorrow, and new content on Friday. I will also take that opportunity to give some updates.
You can see my chess.com blog here
Over the past few days, the 68th Russian Superfinal took place in the city of Chita. Evgeny Tomashevsky took clear first, once again proving he is a new Russian super star to watch. Being that said, I was very interested in following the games of the young star Vladislav Artemiev, in his quest to reach 2700 rating.
The young player Vladislav Artemiev has been a topic of conversation for both specialists and amateurs who enjoy following the progress of the most promising prodigies in the world. He is currently rated 2671, at the age of 17, he is the second most important junior player after the Chinese super star Wei Yi, who is currenty ranked #23 in the world, despite being only 16.
I found this game interesting because it is a great example of Black’s …g6-g5 idea against the Hedgehog structure (which I cover in Chapter 10). Artemiev’s idea seems rather risky at first, but the game’s analysis prove its solid positional foundation. I also Artemiev’s fighting spirit should be commended. He plays for a win with Black, from the very first move, against a much higher rated player.
Here’s the game:
1. e4 c5 2. Nf3 e6 3. d4 cxd4 4. Nxd4 a6 5. Bd3 Ne7!?
Artemiev already deviates from the most common alternatives. By far the most common continuation is 5… Bc5 6. Nb3 and now Black has a choice between Be7 (or 6… Ba7 )
Another standard move is 5… Nf6 6. O-O d6 and now White can play the hedgehog structure with a more aggressive setup after 7. c4 Be7 8. Nc3 O-O 9. Be3 Nbd7 10. f4 Qc7 11. Rc1 b6 12. Qf3 Bb7 13. g4 with attacking chances
6. O-O Nbc6 7. Nb3 g6 8. c4 Bg7 9. Nc3 O-O 10. Bg5 h6 11.Bh4 g5!

I really like this move regardless of what the computer may think. It is difficult to play for a win with Black, and it is often necessary to take risks. This is exactly what this move is doing. Black is now announcing his intention to fight for the control of dark-squares, by preventing White from playing the desirable expanding move f2-f4 at some point.
12. Bg3 Ne5
As it is often the case in the Sicilian structures, having a strong knight on e5 is a big plus. It would be a bad idea to play 12… Ng6? allowing 13.Bd6! Re8 14. c5! and Black’s weakness of dark-squares on the queenside outweighs his control of the e5-square
13. Be2 N7g6 securing the control of the f4-square 14. Qd2
An interesting option was 14.Qd6 !? to disrupt Black’s development, though after 14… Nf4! the threat …Nxe2 followed by …Nxc4 yields a position with balanced chances: 15.Rac1 protecting the c4-pawn 15… Neg6 threatening …Bxc3 to win a piece 16.Qd2 b6 17. Rfd1 Bb7
It is not advisable for White to play 14. f4? since after gxf4 15. Bxf4 Nxf4 16.Rxf4 his dark-squares have been weakened permanently. Besides, Black has the strong reply 16…b5! seizing the initiative, for example 17. cxb5 axb5 18. Nxb5 (18. Bxb5 $2 Qb6+ 19. Kh1 Ng6! 20. Rf3 Bxc3 -+ winning a piece) 18… Ng6! 19. Rf2 Bxb2 20. Rb1 Be5
14… b6 15. f3 Bb7

At this point I would probably prefer Black already, as I feel he has far more resources and targets to pursue. Nevertheless, equality is a much more objective evaluation
16. Bf2 (in case of 16. c5!? trying to open up the position, then 16…bxc5 17.Nxc5 Bc6 18. Rfd1 Nf4! 19. Rac1 Qe7 20. Nb3 Nxe2+ 21. Qxe2 Rfc8 where Black can play for a win without much risk) 16… Nf4 17. Na4 attacking the b6-pawn turns the game into a more or less forced sequence, starting with the trade 17… Nxe2+
Another option was sacrificing a pawn with 17… b5! 18. cxb5 axb5 19. Bxb5 Bc6! 20. Bxc6 dxc6 21. Qxd8 Rfxd8 where Black has more than enough compensation.
18. Qxe2 Nxc4 19. Qxc4 b5 20. Qb4 bxa4 21.Na5 Bc6
An alternative was 21… Rb8 sacrificing an exchange after 22.Ba7 Ba8 23.Bxb8 Qxb8 24. Qxa4 Be5 25. h3 Qxb2 with compensation
22. Nxc6 dxc6 23. Qxa4 Bxb2 24. Rab1 Be5 25. Qxc6

The past nine moves have been more or less forced, but even though several pieces have been traded, the underlying nature of the position has not changed that much. Black still possesses a nice control of dark-squares, and the e5-square continues to be a major tool in Artemiev’s strategy
25…Qd2 (another try was 25… Qa5 $5 26. Qc4 Rfc8 27. Qe2 Qa4) 26. Qc5! a good move, forcing the bishop out of his powerful diagonal 26…Bf6 (26… Qf4?? 27. Bg3+-) 27. Qa3 protecting the a2-pawn 27… Rfd8

With three minor pieces off the board, and a near symmetrical pawn structure, one wouldn’t expect Black to dominate the game so clearly. Typically one would say that Black’s pawns on e6-f7-g-h6 are weak, while White’s pawns on e4-f3-g2-h2 are strong, but here it is exactly the opposite. There are no real targets in Black’s kingside, while the diagonal h2-b8 is a serious concern for White.
28. Qa4 Rac8 29. Rbd1 (29. Qxa6 Rc2! Black’s initiative becomes very powerful. A key variation is 30. Qb6 Be7 31. Qe3 which is refuted by 31… Bc5! 32. Qxd2 Rdxd2 winning a piece, due to 33. Bxc5 Rxg2+ 34. Kh1 Rxh2+ 35. Kg1 Rcg2#) 29… Qe2 30. Rxd8+ (in case of} 30. Rde1 Qb2! Black maintains some serious pressure, because after 31. Qxa6 Rc2 32. Rb1 Qc3 there is a threat to play …Rdd2, and 33.Rfd1 Rxd1+ 34. Rxd1 Be5 35. h3 Qb2 36. Qf1 Qxa2 forces White into an unpleasant defence) 30… Rxd8 31. Re1 Qb2 32. Qxa6?! seriously underestimating the opponent’s attack 32… Rd2! 33. Bg3
33. Rf1 Bd4! winning on the spot, since 33… Rxf2 34. Rxf2 Bd4 35. Qf1 Qxa2 36. g3 34. Bxd4 is met by Rxg2+ 35. Kh1 Rxh2+ 36. Kg1 Qg2#
33… h5! an excellent move
Involving another attacker is the most precise way to make White’s position collapse. Instead, the imprecise 33… Rxg2+? 34. Kh1 h5 is met by 35. Qc8+! Kg7 36. e5 Be7 37. Qc7 Bf8 38. Qd8! and now Black is forced to go into 38… Qd2 39. Qxd2 Rxd2
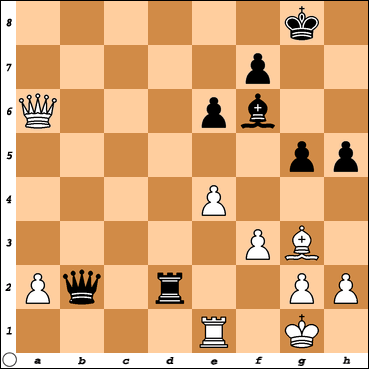
34. Qc8+ Kg7 35. Qc1 (in case of 35. Kh1 Blacks wins with the sequence 35… h4 36. Bb8 h3! 37. gxh3 e5 followed by …Rxh2 checkmating) 35… Qd4+ 36. Kh1 h4 37. Bb8 Qf2 0-1
Final Remarks:
- The key idea in this game was Black’s …h7-h6 followed by …g6-g5. This is a relatively standard approach against the Hedgehog structure, in order to fight for the dark-squares.
- After move 12th, Black might seem to be somewhat behind in development, but this didn’t make a difference because Artemiev had taken positional control of the game. White spent the next few moves simply moving around in a futile search for a plan.
- The position after move 25th is a great illustration of Black’s strategy. Even though the position is simplified and his kingside might seem to be weakened, he continues to be in control of the game. His position is far more threatening, and his king safer than White’s.
- Artemiev is one of the world’s young starts to watch.
As usual, comments and suggestions are always welcome. If you like this content, do not forget to follow this blog by clicking the “Follow” option at the right bottom of the page.
