Minnesota’s Young Talents at World Youth 2017

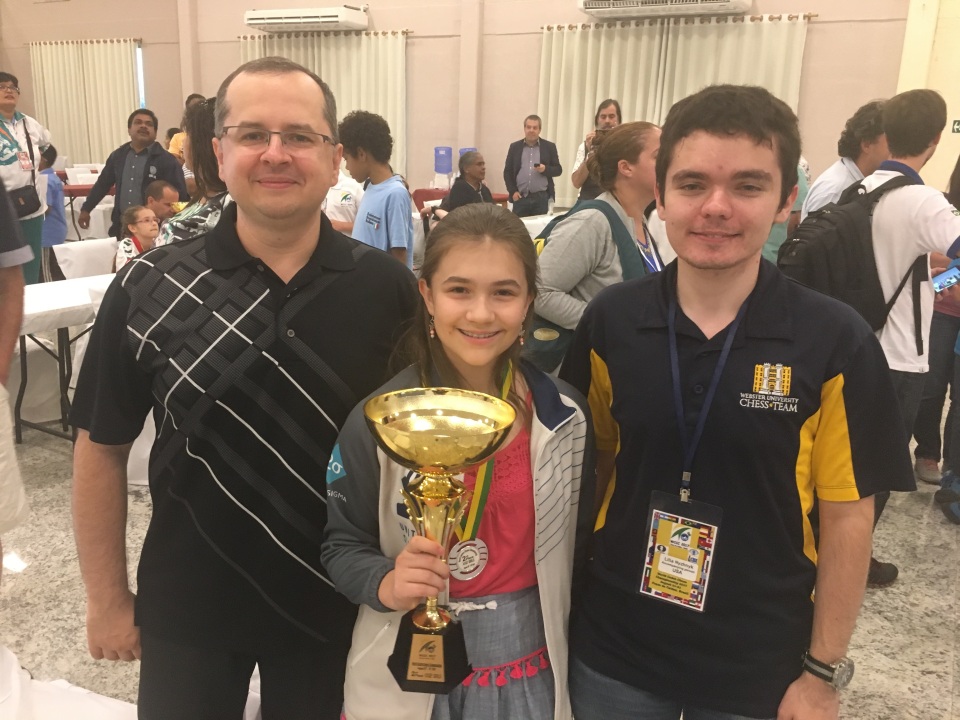
Over the last two weeks, the youngest elite of the chess world gathered together in Brazil, to dispute the World Youth Chess Championship in the categories under 8, under 10, and under 12. Over the last several years, the state of Minnesota has made substantial progress, when it comes to organizing regular tournaments, and providing some of the opportunities that young talented players need in order to improve past amateur level. Three of our young players attended this event: Alice Li in girls under 8, her brother Linden Li competed in Boys under 12, and Nastassja Matus competed in girls under 12.

picture_linden_alice.png

For Alice and Linden, this was their first opportunity to compete in an event of this caliber, and they did so in great form. Alice managed to tie for 3rd place with 8/11, though she finished 5th on tiebreaks. She finished higher than all other American players in her category, thus confirming she is in fact the strongest American girl in her age group. Her brother Linden had a strong first performance with 6.0/11. Both of their performances are very promising, considering that these siblings played their first chess competition only 1 year ago.

Nastassja Matus has already accumulated plenty of World Championship experience over the years. This is her fifth event, but this year her chances were much higher, as she has been accumulating a series of excellent results over the last year. Nastassja obtained the Woman Fide Master title last year, after winning the Pan American under 12 (at age 11), and this year, she obtained 4th place at the Pan American under 18, quite a convincing display of her ability. She also managed to win the Susan Polgar Girls Invitational Event, overcoming the nation’s top high school and middle school female players, again, in a very convincing fashion.

Nastassja’s results did not disappoint. She was able to defeat former World Champion Rakshitta Ravi (Greece 2015, under-10) among many other strong players. Toward the end of the tournament, the tournament was a two-horse race between Nastassja and Divya Deshmuk, the eventual winner. They were both winning their games, but unfortunately, Divya Deshmuk emerged as the sole winner in the final rounds. For my taste, this was perhaps a combination of experience, and maybe even a little bit of chess-luck (more on this later). Now, let’s see one interesting game from each player:

Linden’s 9th round victory

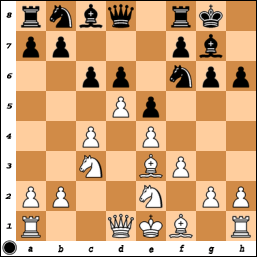
1. d4 Nf6 2. c4 e6 3. g3 d5 4. Nf3 c6 5. Bg2 Bd6 6. Qc2 Nbd7 7. O-O O-O 8. Nbd2
White is getting ready to play e2-e4, going into a favorable CaroKann type
structure. Now 8…e5 It seems that Black may need to play this move sooner or later
in order to prevent White from gaining a strong control of the center after
e2-e4.

LindenImage1

If Black had played 8… Re8 then after 9. b3 Qe7 10. Bb2 e5 11. cxd5 cxd5 12.
dxe5 Nxe5 the position is similar to the game.

The point is that, after 8…Re8 9. e4?! is met by Nxe4! 10. Nxe4 dxe4 11. Qxe4 e5! =
and Black achieves the standard …e6-e5 break of the Caro Kann pawn structure,
without losing any material in the process. White immediately loses his
central dominance, and the game is even.

9. cxd5 cxd5

Black could avoid the creation of an isolani by playing 9… Nxd5?! but then after 10.
Nc4 Qe7 11. Nxd6 Qxd6 12. e4 Nb4 13. Qc3 White’s much better. We will end
up playing a 2-4 vs. 3-3 pawn structure, in which White has the pair of
bishops and better piece coordination

10. dxe5 Nxe5 We have reached an Isolani pawn structure, chapter #1 in my book. In many cases Black could like to play for a kingside attack, but this is unlikely to happen here, given the fianchetto. White’s position seems to be somewhat preferable, but any
advantage is minimal at the moment, since Black still has his dark-squared
bishop, a key player given his isolani is on a light-square (d5)

11. e3?! This move is rather imprecise for two reasons:

  1. White could have developed his bishop via g5, or e3-d4, but now this is impossible.
  2. This move is unnecessary, does not really add anything, but it does waste a tempo.

Linden should have continued with 11. Nxe5! Bxe5 12. Nf3 Bd6 13.Rd1 with a pleasant advantage. The d5-pawn is well blocked, and Black does not seem to have any obvious sources of counterplay. Still, Black would have a solid position; this position could have led to a long fight.

We continue with the game:

11…Nxf3+

To illustrate White’s imprecision, Black could have continued with
11… Qe7 since now 12. Nxe5 Qxe5 13. Nf3 Qh5 and the queen on h5 is far
more active than on d8, so this position is much more promising for Black than
the position after 11.Nxe5

12. Nxf3 Be6 13. b3 Rc8 14. Qd3 Qe7 15. Bb2
White has secured a stable advantage, the d5-pawn is well blocked, and now he
can improve his pieces gradually

LindenImage2.png

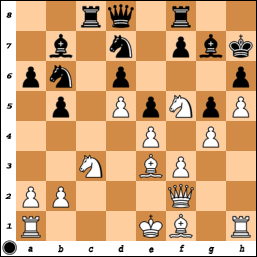
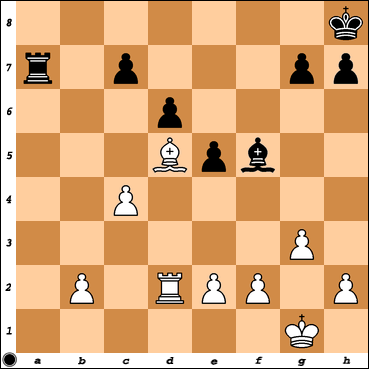
15…h6 16. a4 Rfd8 17. Nd4 a6 18. Rfd1 Rd7?
Black should have probably continued with 18… Be5 to prevent White from
placing a knight on f5 too easily.

LindenImage3

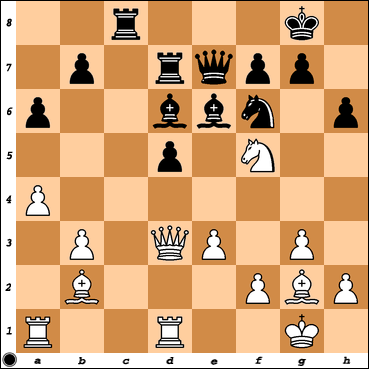
19. Nf5! Qd8 (In case of19… Bxf5 20. Qxf5 Black is losing material by force, due to the pressure on f6 and d5, for example: 20… Rcd8 21. Bxf6 Qxf6 22. Qxf6 gxf6 23. Rxd5 Be5 24. Rxd7 Rxd7 25. Rc1 and the resulting ending is nearly winning for White in
spite of the opposite colored bishops

20. Bh3!? Linden, just like most typical young talents, is constantly on the lookout for tactical opportunities, and this game is no exception. Perhaps he missed a good positional idea in this game, but his calculation ability will get him far.

He could have secured a substantial advantage after 20. Nxd6 Rxd6 21. Rac1,
since now Black does not have his dark-squared bishop. This piece is very
important because the isolani is on light-squares. Now White can easily move
through dark-squares, especially the d4-square, giving him a very good control
of the game. For reference, you can see the game Vitiugov-Bologan (1-0), in
page 28 of the first chapter of Chess Structures.

20… Rb8? Black has missed the threat posed by 20.Bh3, and he will suffer the consequences. Black should have played 20… Bf8 . Now the game continued with

21. Nxh6! gxh6 22. Bxe6 fxe6 23. Qg6+ Rg7 24. Qxf6

White has a clean pawn up, but now Black has some counterplay
that needs to be neutralized

LindenImage4.png

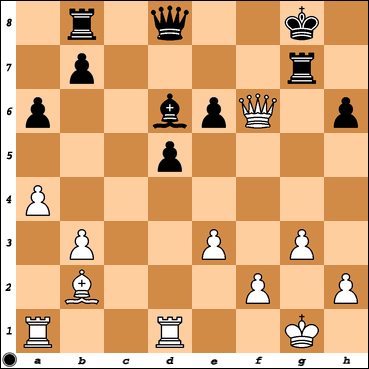
24…Qxf6 25. Bxf6 Rf7 26. Bd4 Rc8 27. Rac1 Rfc7 28. Rxc7 Rxc7 29.
Rd3 Bb4 30. Be5 Rc1+ 31. Kg2 Rc2?! More stubborn would have been 31… Kf7

32. Rd4! Bc5? this mistake allows White to gain a decisive advantage:

33.Rg4+ Kf7 34. Rg7+ Ke8 35. Rc7! now Black’s forces are paralyzed, and
White can win more material while Black must deal with the pin along the c-file. 35…a5 36. Bf4 b6 37. Bxh6 Rb2 38. Bg7 Rxb3 39. h4 and the h-pawn will decide
the game 39…Be7 40. h5 Kf7 41. h6 Black resigns. Overall, a very convincing
game, from a young talent, who has only practiced chess seriously for a little
over a year. I hope to see much more from this player in the coming months and
years. 1-0

Alice’s 9th round victory

baobei-brazil-p

1. d4 d5 2. c4 c6 3. Nf3 Nf6 4. g3!? a relatively unusual move order; Alice
aims to play Catalan style, in spite of Black choosing the Slav 4…Bf5 5. Bg2
Bxb1?! Black hopes to win a pawn, but in the process falls behind in
development.

Black could have secured a solid position after 5… e6 6. Nc3 Nbd7 7. O-O h6 and now White’s light-squared bishop is not particularly impressive against Black’s c6-d5-e6 center, but more importantly, the bishop on f5 is very well placed, compared to the bishop on c8, which is typical of the Catalan.

6. Rxb1 Qa5+ 7. Bd2 Qxa2 8. cxd5  Qxd5 9. O-O

For the cost of one pawn, Alice now has the pair of bishops, initiative, and will gain control of the center after an eventual e2-e4.

AliceImage1.png

9…Qd8 10. Qb3 Qb6 11. Qc4! of course, trading queens is undesirable 11…e6  12. Ne5 Be7 13. Bh3!? an interesting idea, preventing Black from castling, hence keeping the king in the center, where it will be in constant danger 13… Nbd7 the point of Alice’s
last move is that if Black tried to castle with 13… O-O? then after 14. Bxe6! fxe6 15. Qxe6+ Kh8 16. Qxe7, and White is two pawns up.

14. Be3 this move prevents Black from taking on e5, but at the same time, blocks the
desirable e2-e4 move 14…Nd5 15. Nxd7 Kxd7 16. Bd2!

Alice takes a step in the right direction. Now e2-e4 and d4-d5 are coming

16…Rad8 17. e4 Nc7 18. d5!

Alice displays an excellent understanding of the game, by opening the center when
her opponent’s king is unsafe, and at the same time, taking advantage of her
bishop pair

AliceImage2.png

18…Qc5 19. Qb3! Again, White does not wish to trade queens, but at the same time, Alice keeps the pressure on the e6-pawn 19… b6 20. Bf4 Bd6 21. dxc6+ Qxc6? {only makes things worse, escaping with the king was necessary. Black should have played 21… Kc8! in order to secure a safe place for his king

22. Rfd1 22… Ke7 23. Rbc1 Qb7 (Black’s last chance was playing 23… Bc5) 24. Bxd6+ Rxd6 25. Qb4 creates a decisive pin, and wins the game convincingly.

AliceImage3.png

25…Rhd8 26. Rxd6 Rxd6 27. e5 a5 28. Qxd6+ Ke8 29. Rxc7 Qa8 30. Qe7# Quite a brilliant win for someone who has yet to turn 8. 1-0

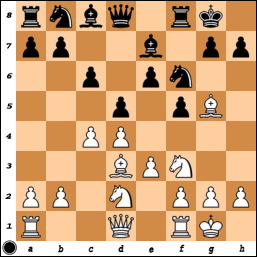
Nastassja’s 3rd round win

IMG_3277


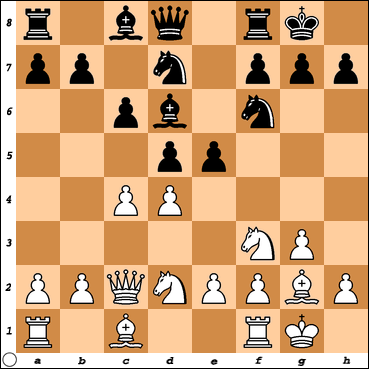
1. d4 Nf6 2. c4 e6 3. g3 Bb4+ 4. Bd2 Qe7 5. Nf3 Nc6 6. Nc3 d6 7. Bg2 Bxc3 8.
Bxc3 Ne4 9. Rc1 O-O 10. d5 Nxc3 11. Rxc3 Nb8 12. dxe6 fxe6 13. O-O Nd7 14. Qc2
e5

NastassjaImage1

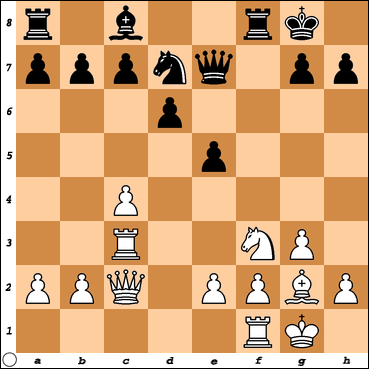
This is what chess progress has come to in recent years. Here we have two
(admittedly very strong) 12-year old girls, playing 15 moves straight from the
book. White enjoys a very slight advantage because of his development lead,
but of course, a huge level of precision is required if one wants to preserve
this advantage into the middlegame.

Now White played 15. Nd2! clearing the h1-a8 diagonal for the bishop (making it hard for Black’s bishop to develop), and at the same time, preparing for a potential c4-c5, after preparing it with either b2-b4 or Ne4} 15…Nf6 16. Ne4! an excellent move, trading Black’s only defender of the d5-square, and therefore preparing the c4-c5 break in the next move.

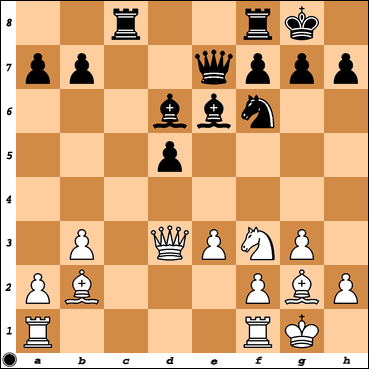
16… Kh8?! this is a relatively subtle imprecision. Most players would not have known how to capitalize on this mistake, but Nastassja does not waste time: 17. Nxf6! White has a clear plan, and trading that knight is a part of it, c4-c5 is now imminent 17… Qxf6 (in case of 17… Rxf6, then 18. c5!)

18. Rf3 (White could have also continued with the direct 18. c5)

18… Qe7 19. Rxf8+ Qxf8 20. Rd1 preparing c4-c5

NastassjaImage2
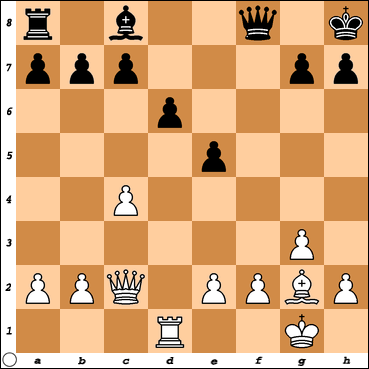
20… Bf5 21. Qd2 Rb8 22. Qa5! Nastassja does not miss one opportunity, and
she will now be a pawn up even though Black did not make any serious mistake
yet 22… Qc8 23. Qxa7 Ra8 24. Qxb7 Qxb7 25. Bxb7 Rxa2 (in case of 25… Rb8?! 26. Bd5 Rxb2 27. Ra1! and now White’s a-pawn is very threatening.  26. Rd2 Ra7 27. Bd5

NastassjaImage3

White has a clean pawn up, with no compensation, and the rest was relatively easy

27…Bh3 28. f3 h5 29. Be4 heading toward g6, in order to capture the h5-pawn 29… Kg8 30. Bg6 Kf8 31. Bxh5 Ra1+ 32. Kf2 Rf1+ 33. Ke3 Bf5 34. Bg4 Bg6 35. Be6 Ke7 36. Bd5 Kd7 37. c5! Rh1 38. cxd6 cxd6 39. h4 Rc1 40. g4 Rc5 41. Be4 Bf7 42. Rc2 Ra5 43. Bf5+ Ke7 44.Kf2 g6 45. Rc7+ Ke8 46. Bd3 d5 47. b4 now the b-pawn will easily decide the game Ra8 48. Bb5+ Kf8 49. Bc6 Rb8 50. b5 Be6 51. Ra7 d4 52. Ra8 Rxa8 53. Bxa8 Ke7 54. Bc6 Bf7 55. b6 Kd6 56. b7 Kc7 57. Ke1 Bc4 58. Be8 Kxb7 59. Bxg6 Kc7 60.h5 Bg8 61. h6 1-0

Black resigns. Overall, a very convincing win for Nastassja. I
was particularly impressed with her solid opening and how quickly she was able
to turn a small opening advantage into an extra pawn, to later convert a
winning ending, without ever giving chances. Nastassja’s ability to convert
good positions showed throughout the entire tournament, as she defeated some
of the strongest girls in the world. This time, she had to settle for a Silver
Medal, not bad, but I certainly see a Gold Medal in her future. 1-0

New Projects & Other Updates

It has been a year since Quality Chess published of Chess Structures, and I must admit that the book’s success has exceeded all my expectations. Here are a few of the reasons:

  1. The book was voted as Quality Chess Best Book of 2015 by a wide margin (votes were cast in an online poll, by 421 readers, as opposed to a small committee)
  2. The book was shortlisted for ECF Book of the Year, unfortunately didn’t win
  3. A French Translation was recently published by ToutPourLesEchecs, a very short review is here.
  4. An Italian Translation will be published next month by Prisma Scacchi.
  5. The book received excellent reviews by many specialists, such as Grandmaster Julio Sadorra. His extremely detailed two part review can be seen here and here.
  6. Readers have given great reviews in Amazon too (more reviews are always encouraged/welcome!)

In addition to the above, I have received many supportive emails from readers. I am glad my 1st book helped so many players and in this post I would like to announce I plan to write three follow up works. The concept and teaching methodology of Chess Structures was very well received, and I have decided to expand this treatment of chess strategy. I hope my next books will bring many interesting insights into

  1. New Aspects of the Game (Both endings & middlegame, I can’t disclose details yet)
  2. Examine Complex Structures previously ignored
  3. Provide a deeper coverage of selected structures

Even though I am not in complete control of my book’s publishing dates, I believe my 2nd book will be out in 2017, my 3rd in 2018, and the final book of the series will be out in 2019. I can’t be more specific at the moment, but I think this schedule is very realistic.

I am personally very interested in hearing about the opinion of my readers. For this reason, I am making this announcement. I would like to hear about the following:

  1. Which pawn structures would you like to know more about?
  2. In what ways could the next book be an improvement over Chess Structures?
  3. Is there a particular topic or aspect of the game you think ought to be included

I encourage you to leave a comment below, and/or email your suggestions to gm.mauricio.flores@gmail.com. Even though I have been selecting material for months, I still have lots of flexibility and I will be happy to take your suggestions into account. If I can’t include your suggestion into the books, at least it can be discussed in a blog post =)


Now, as usual, I am posting my analysis of a recent game. This time, the final game in the World Championship match. I believe this game was the most interesting game of the match (from a technical standpoint). Hou Yifan obtained the Najdorf Type I structure (Chapter 8 in the book) in the ending, and managed to carry out the standard c4-c5 plan with a decisive effect. Meanwhile, Muzychuk’s kingside play proved ineffective, as there are no realistic checkmate threats and White’s pawn structure seems to neutralize other attempts. My personal guess is that, despite the engine’s modest evaluation, Hou Yifan was able to correctly assess this ending as very favorable for her, at least in practice.

1. e4 c5 2. Nf3 Nc6 3. d4 cxd4 4. Nxd4 Nf6 5. Nc3 d6 6. Be2 e5 7. Nb3 Be7 8.O-O O-O 9. Be3 Be6 10. f3 Na5 11. Nxa5 Qxa5 12. Qd2 Rfc8 13. Rfd1

We have a standard Najdorf type 2 position. Even though the control of the d5-square is still under dispute, White’s position is somewhat preferable due to the awkward placement of Black’s pieces. It would have been better to have the queen on c7, the rooks on c8 & d8, and a pawn on a6

13…Kf8 protecting the bishop on e7

The careless 13…a6? is met by 14. Nd5! Qxd2 15. Nxe7+ Kf8 16. Bxd2 Kxe7 17. Bb4 Rc6 18. b3 Rac8 19. c4 where White is much better

14. a4 a6 15. Nd5! a good decision, converting the position into a Najdorf Type I structure, under very favorable conditions, to be explained below. 15…Qxd2 16.Rxd2 Nxd5 17. exd5 Bd7 18. a5!

This move is necessary to keep the queenside fixed. White has one image in mind: placing his pawns on a5, b4, c4, d5 and then prepare the standard pawn break c4-c5. A careless move like 18.Kf1 could have been met by 18…a5! and now White’s queenside will struggle to advance

18… Bb5 19. Kf1 (of course not 19. Bxb5? axb5 after which Black will easily activate his pieces) 19… f5 20. c3 g5 21. Rc2 h5 22. c4 g4 23. b4 f4 24. Bf2 Bd7 25. c5 Bf5

White’s also a little better after 25…gxf3 26. gxf3 Bh3+ 27. Ke1

26. Rc4 Kf7 27. Rd1 Rg8 28. g3!

Clarifying the situation in the kingside. The subsequent trades will completely neutralize Black’s kingside initiative. White’s domination becomes obvious
28…fxg3 29. hxg3 Rac8 30. fxg4 hxg4 31. Kg2

The resulting position is a testament of Hou Yifan’s superior understanding. After a series of trades she not only managed to block her opponent’s kingside attempt, but also turn the g4-pawn into a potential liability for the future. The threats c5-c6 and cxd6
must be taken seriously

31…Bd7 32. Rh1 Rg7? it was necessary to simplify with} 32… Bb5! 33. Rc2 Bxe2 34. Rxe2 Rh8 where Black remains under pressure, but retains chances to save the game

32…Rg7? is probably the decisive mistake, as it allows White to obtain two passed connected pawns after the nice sequence:

33. cxd6 Bxd6 34. Rxc8 Bxc8 35. Bc5! very simple and effective,
this move lifts the blockade of the d5-pawn and leaves Black in a
strategically lost position.

35…Bxc5 (it does not help 35… Ke7 36. Rh6! and Black is forced to take on c5, creating the connected passed pawns that decide the game) 36. bxc5 Bf5 37.Kf2 Rg8 38. Ke3 Rd8 39.Rf1 Kg6 40. Rd1 Kg5 41. d6 Rh8?! a desperate attempt to seek counterplay in an otherwise lost position. 42. d7! Black probably missed this direct approach, which seals the result of the game almost immediately. It will be impossible for Muzychuk to stop all the pawns

42… Rd8 43.c6! The decisive blow, now the a-pawn finishes off the game 43…bxc6 44.Bxa6 c5 45. Bb7 c4 46. a6 1-0

A very convincing finish for the three time World Champion Hou Yifan.

Final Remarks:

Probably the most remarkable thing about this game is how Hou Yifan goes from a seemingly level ending into an obviously winning position in the space of ten moves. In my opinion, Muzychuk did not properly assess her chances in the ending. Black’s position wasn’t quite good enough for the following reasons

  1. White’s pawn had already reached a5, guaranteed a space advantage in the queenside, and ensuring the effectiveness of a c4-c5 break
  2. Black’s kingside attack wouldn’t offer mating prospects
  3. Black needed to break on the queenside with the natural e5-e4, but having her rooks on c8 & a8, this plan wasn’t well suited for success.

Overall, a pretty long post this time. I chose this example because it illustrates some of the strategic nuances of the Najdorf Type I in an ending. Something I didn’t do in my 1st book, but definitely something I plan to do in the future. I am awaiting for comments and suggestions. Thanks for reading.


A Refutation to Navara’s King March

After a very long absence from this website (school work and new writing projects), I have decided to get back into blogging. As some of you may have noticed, I started publishing my blog within chess.com (publishing chess boards with them is so much easier). This post was published in my chess.com blog about 8 months ago, but I never got around to posting it here. For those of you who haven’t seen it, here it is. Don’t forget to checkout yesterday’s post as well =)

My next post, with new content and some updates is coming this Friday!. 

While I often use this blog as a way of expanding upon the ideas presented in my book, Chess Structures – a Grandmaster Guide, this time I chose to talk about a different subject, Navara’s king march, played in Biel a few months ago.

This topic was brought to me by Paul McGann, a chess player and physician from Baltimore. He was fascinated with Navara’s King March, and Kavalek’s analysis of the game, but was able to find some defficiencies in this analysis too. Over the course of a few weeks, we discussed some lines over email, until he decided to let his computer run for four days straight. A clear conclusion emerged: the King March has a refutation! In this blog I will show you the refutation found by him.

While I do think Navara’s King March will go down in history as a notable example of courage and determination to play for a win, this finding is very interesting. It reminds us of how powerful computers are, and how amazing possibilities can be uncovered by today’s machines. Let’s see the refutation then. We will deviate from the original game with move 24…Bd3!!

The full analysis can be viewed in the game viewer below:

https://www.chess.com/emboard?id=2714800

My next post is coming up Friday, March 18th

Chess Structures in Practice – The Hedgehog

I write this blog in order to expand upon the ideas presented in my book Chess Structures – a Grandmaster Guide, published this year by Quality Chess. I follow the games of the elite on a daily basis, often looking for new instructive examples and structure-related concepts worth sharing with my readers. 

After a very long absence from this website (school work and new writing projects), I have decided to get back into blogging. As some of you may have noticed, I started publishing my blog within chess.com (publishing chess boards with them is so much easier). This post was published in my chess.com blog about 8 months ago, but I never got around to posting it here. For those of you who haven’t seen it, here it is. For those of you who have, I will be posting my 9th post tomorrow, and new content on Friday. I will also take that opportunity to give some updates.

You can see my chess.com blog here

Over the past few days, the 68th Russian Superfinal took place in the city of Chita. Evgeny Tomashevsky took clear first, once again proving he is a new Russian super star to watch. Being that said, I was very interested in following the games of the young star Vladislav Artemiev, in his quest to reach 2700 rating.

The young player Vladislav Artemiev has been a topic of conversation for both specialists and amateurs who enjoy following the progress of the most promising prodigies in the world. He is currently rated 2671, at the age of 17, he is the second most important junior player after the Chinese super star Wei Yi, who is currenty ranked #23 in the world, despite being only 16.

I found this game interesting because it is a great example of Black’s …g6-g5 idea against the Hedgehog structure (which I cover in Chapter 10). Artemiev’s idea seems rather risky at first, but the game’s analysis prove its solid positional foundation. I also Artemiev’s fighting spirit should be commended. He plays for a win with Black, from the very first move, against a much higher rated player.

Here’s the game:

1. e4 c5 2. Nf3 e6 3. d4 cxd4 4. Nxd4 a6 5. Bd3 Ne7!?

Artemiev already deviates from the most common alternatives. By far the most common continuation is 5… Bc5 6. Nb3 and now Black has a choice between Be7 (or 6… Ba7 )

Another standard move is 5… Nf6 6. O-O d6 and now White can play the hedgehog structure with a more aggressive setup after 7. c4 Be7 8. Nc3 O-O 9. Be3 Nbd7 10. f4 Qc7 11. Rc1 b6 12. Qf3 Bb7 13. g4 with attacking chances

6. O-O Nbc6 7. Nb3 g6 8. c4 Bg7 9. Nc3 O-O 10. Bg5 h6 11.Bh4 g5!

I really like this move regardless of what the computer may think. It is difficult to play for a win with Black, and it is often necessary to take risks. This is exactly what this move is doing. Black is now announcing his intention to fight for the control of dark-squares, by preventing White from playing the desirable expanding move f2-f4 at some point.

12. Bg3 Ne5

As it is often the case in the Sicilian structures, having a strong knight on e5 is a big plus. It would be a bad idea to play 12… Ng6? allowing 13.Bd6! Re8 14. c5! and Black’s weakness of dark-squares on the queenside outweighs his control of the e5-square

13. Be2 N7g6 securing the control of the f4-square 14. Qd2

An interesting option was 14.Qd6 !? to disrupt Black’s development, though after 14… Nf4! the threat …Nxe2 followed by …Nxc4 yields a position with balanced chances: 15.Rac1 protecting the c4-pawn 15… Neg6 threatening …Bxc3 to win a piece 16.Qd2 b6 17. Rfd1 Bb7

It is not advisable for White to play 14. f4? since after gxf4 15. Bxf4 Nxf4 16.Rxf4 his dark-squares have been weakened permanently. Besides, Black has the strong reply 16…b5!  seizing the initiative, for example 17. cxb5 axb5 18. Nxb5 (18. Bxb5 $2 Qb6+ 19. Kh1 Ng6! 20. Rf3 Bxc3 -+ winning a piece) 18… Ng6! 19. Rf2 Bxb2 20. Rb1 Be5

14… b6 15. f3 Bb7

At this point I would probably prefer Black already, as I feel he has far more resources and targets to pursue. Nevertheless, equality is a much more objective evaluation

16. Bf2 (in case of 16. c5!? trying to open up the position, then 16…bxc5  17.Nxc5 Bc6 18. Rfd1 Nf4! 19. Rac1 Qe7 20. Nb3 Nxe2+ 21. Qxe2 Rfc8 where Black can play for a win without much risk) 16… Nf4 17. Na4 attacking the b6-pawn turns the game into a more or less forced sequence, starting with the trade 17… Nxe2+

Another option was sacrificing a pawn with 17… b5! 18. cxb5 axb5 19. Bxb5 Bc6! 20. Bxc6 dxc6 21. Qxd8 Rfxd8 where Black has more than enough compensation.

18. Qxe2 Nxc4 19. Qxc4 b5 20. Qb4 bxa4 21.Na5 Bc6

An alternative was 21… Rb8 sacrificing an exchange after 22.Ba7 Ba8 23.Bxb8 Qxb8 24. Qxa4 Be5 25. h3 Qxb2 with compensation

22. Nxc6 dxc6 23. Qxa4 Bxb2 24. Rab1 Be5 25. Qxc6

The past nine moves have been more or less forced, but even though several pieces have been traded, the underlying nature of the position has not changed that much. Black still possesses a nice control of dark-squares, and the e5-square continues to be a major tool in Artemiev’s strategy

25…Qd2 (another try was 25… Qa5 $5 26. Qc4 Rfc8 27. Qe2 Qa4) 26. Qc5! a good move, forcing the bishop out of his powerful diagonal 26…Bf6 (26… Qf4?? 27. Bg3+-) 27. Qa3 protecting the a2-pawn 27… Rfd8

With three minor pieces off the board, and a near symmetrical pawn structure, one wouldn’t expect Black to dominate the game so clearly. Typically one would say that Black’s pawns on e6-f7-g-h6 are weak, while White’s pawns on e4-f3-g2-h2 are strong, but here it is exactly the opposite. There are no real targets in Black’s kingside, while the diagonal h2-b8 is a serious concern for White.

28. Qa4 Rac8 29. Rbd1 (29. Qxa6 Rc2! Black’s initiative becomes very powerful. A key variation is 30. Qb6 Be7 31. Qe3 which is refuted by 31… Bc5! 32. Qxd2 Rdxd2 winning a piece, due to 33. Bxc5 Rxg2+ 34. Kh1 Rxh2+ 35. Kg1 Rcg2#) 29… Qe2 30. Rxd8+ (in case of} 30. Rde1 Qb2! Black maintains some serious pressure, because after 31. Qxa6 Rc2 32. Rb1 Qc3 there is a threat to play …Rdd2, and 33.Rfd1 Rxd1+ 34. Rxd1 Be5 35. h3 Qb2 36. Qf1 Qxa2 forces White into an unpleasant defence) 30… Rxd8 31. Re1 Qb2 32. Qxa6?! seriously underestimating the opponent’s attack 32… Rd2! 33. Bg3

33. Rf1 Bd4! winning on the spot, since 33… Rxf2 34. Rxf2 Bd4 35. Qf1 Qxa2 36. g3 34. Bxd4 is met by Rxg2+ 35. Kh1 Rxh2+ 36. Kg1 Qg2#

33… h5! an excellent move

Involving another attacker is the most precise way to make White’s position collapse. Instead, the imprecise 33… Rxg2+? 34. Kh1 h5 is met by 35. Qc8+! Kg7 36. e5 Be7 37. Qc7 Bf8 38. Qd8! and now Black is forced to go into 38… Qd2 39. Qxd2 Rxd2

34. Qc8+ Kg7 35. Qc1 (in case of 35. Kh1 Blacks wins with the sequence 35… h4 36. Bb8 h3! 37. gxh3 e5 followed by …Rxh2 checkmating) 35… Qd4+ 36. Kh1 h4 37. Bb8 Qf2 0-1

Final Remarks:

  1. The key idea in this game was Black’s …h7-h6 followed by …g6-g5. This is a relatively standard approach against the Hedgehog structure, in order to fight for the dark-squares.
  2. After move 12th, Black might seem to be somewhat behind in development, but this didn’t make a difference because Artemiev had taken positional control of the game. White spent the next few moves simply moving around in a futile search for a plan.
  3. The position after move 25th is a great illustration of Black’s strategy. Even though the position is simplified and his kingside might seem to be weakened, he continues to be in control of the game. His position is far more threatening, and his king safer than White’s.
  4. Artemiev is one of the world’s young starts to watch.

As usual, comments and suggestions are always welcome. If you like this content, do not forget to follow this blog by clicking the “Follow” option at the right bottom of the page.

Structures in Practice – The King’s Indian Type I

I write this blog to share some of the ideas from my book Chess Structures, published earlier this year. Each blog posts expands upon some of the concepts shown in my book, by analyzing a recent game amont strong players.


Last week the US Junior Championship took place in Saint Louis, where many of the nation’s best youngsters competed for the coveted title. At the end, International Master Aksath Chandra won the event with 7 points out of 9 possible, closely followed by GM-elect Jeffrey Xiong with 6.5 points and IM Arthur Shen with 6 points. For many spectators, including myself, one of the main attractions of this event was seeing Liang Awonder’s games. He just turned 12 a couple of months ago, and his FIDE rating is an amazing 2404, which makes him #2 in the world within the under 12 division, and certainly one of the most promising players the US has ever produced.    Most would expect such a young player to be an extremely strong tactician, and a ratherweak strategist, due to his young age – often good strategy and patience come with age. But to my surprise, Liang Awonder can be an excellent strategical player, as you will see in the next game. The game started out with a King’s Indian Defence, and after an early pawn trade …cxd5 and cxd5, queens were traded and Liang obtained a strategically superior endgame, which he won with class. I am sure he even knew, as early as move ten, that the resulting ending would be much favorable for him, hence his desire to trade queens voluntarily at an early stage. Let’s see the game:


Liang, Awonder (2428) – Han, Curran (2221)
2015 US Junior Closed Championship, July 7th, 2015.

1. c4 Nf6 2. Nc3 g6 3. e4 d6 4. d4 Bg7 5. f3 O-O 6. Nge2 e5 7. Bg5 Nbd7 8. Qd2 c6 9. Rd1 Qa5 10. d5! transforming the position favorably

10…cxd5   it was probably better to aim for a King’s Indian type II structure with 10… c5 though White has some pleasing options like 11. Nb5!? attacking the d6-pawn, and after 11…Qb6 12. Nec3 {the only move is 12…Nb8 13. Bd3+= where White enjoys some lead in development

11. Nxd5 Qxd2+ 12. Kxd2 Nxd5 13. cxd5
queens are off the board, and the resulting ending is probably much worse than Black expected it would be. Although most engines may indicate the current position is equal, White enjoys a lasting advantage, at least practically speaking. He has more space in the center, and this is what really matters. The game will turn to White’s favor little by little
13…f6 14. Be3 f5 15. Nc3
protecting e4 and threatening 16.Nb5, attacking Black’s vulnerable points a7, c7 and d6
15…a6 16. g4!

claiming space in the kingside makes perfect sense for White, he has a solid center and now can expand on both sides of the board
16…fxg4
If 16… f4 17. Bf2 Bf6 18. h4 Bd8! rerouting the bishop to a more convenient diagonal, but after 19. Rc1+= White maintains a risk free advantage.
In case of 16… Nf6 17. h3! is a simple method for White to keep the advantage without complications. The alternative 17. gxf5?! gxf5 18. Rg1 Kh8 could give Black some counterplay
17. fxg4 Bf6?! this is a suboptimal piece arrangement
17… Nf6 18. h3 Bd7 19.Bd3 Rf7 20. b3 Bf8 21. Rc1 Be7 22. Na4 $5 Bxa4 23. bxa4 Bd8 24. Rhf1+=
18.Be2   the alternative 18. g5!? Bd8 19. h4 is similar to the game 18…b5 gaining some space in the queenside, and allowing the bishop on c8 to move, but also turning the b-pawn into a permanent weakness.
The option 18… g5, hoping to claim space and make possible the maneouvre …Nf8-g6-f4, is met
strongly by 19. h4! h6 20. hxg5 20… Bxg5 21. Bxg5 hxg5 22. Rh5+=
19. Rdf1 Bb7 20. g5! a strong move, gaining space and clearing the g4-square for a powerful bishop. 20…Bd8 21. Bg4 Rxf1 22. Rxf1 Nf8 23.b4

White’s  last move is both natural and strong, now the b5-pawn is fixed and will soon become a target
23…Bc8 24. Bd1 Bh3 25. Rg1 Rb8 26. Be2 Bd7 27. Rc1 a5?!
again, Black’s ‘active’ moves in the queenside play against him, now the b5-pawn has lost support. It was better to wait passively with 27… Be8 though after 28. Rb1 Nd7 29. a4 bxa4 30. Nxa4 += White stays in control.
28. a3 Kf7 29. Rb1! indirectly pressing against the b5-pawn. Now White has a big advantage.
29…a4 this move was necessary sooner or later. Now the b5-pawn, and consequently the a4-pawn are seriously vulnerable.

In case of 29… axb4?! 30. axb4 only White will benefit from using the a-file. The waiting move 29… Kg8 can be met by 30. Kd1! and now the b5-pawn is under attack.
30. Nd1 White can now shuffle his pieces around, to find the optimal locations for a decisive strike 31…Be8 31. Rc1 Ke7 32. h4 Nd7 33. Nc3 Nf8 34. Rf1 Rb7 35. Nd1 Nd7 36. Nf2 Bb6?!
Trading the dark-squared bishop only gives White more entry points, like c7 and f6. A better option was 36… Kf7 37. Ng4+ Kg7 38. Rc1 Rb8 39. Rc6 Be7 eventually Black is losing material, for example after 40. Ra6 Rb7 41. Ra8 Rb8 42. Ra5 {and now the only way to defend the pawn is} Nb6 43. Ra7 Nd7 and now White has the tactical resource 44. Nf6! Bxf6 45. gxf6+ Kxf6 46. Bg4
winning a knight, since Nf8? 47. Bg5#
37. Bxb6 Rxb6 38. Ng4 Rb7 39. Rc1 Kd8 40. Rc6

40…Ke7 The alternative was trading rooks 40… Rb6 41. Rxb6 Nxb6 but after 42. Nf6! a pawn is lost Ke7 43. Nxh7 Na8 44. Nf6 Nc7 and the endgame is hopeless, for example 45. Ke3 Bf7 46. Kf2 Kf8 47. Kg3 Kg7 48.h5 gxh5 49. Kh4 Bg6 50. Bxh5+-
41. Ra6 Nb6
In case of 41… Rb8 42. Ra5 Nb6 43. Nf6 h5 44. Ra7+ Kf8 45. Rh7! and Black is desperate, for example 45…Rc8 46. Rb7 Nc4+ 47. Bxc4 bxc4 48. Kc3+-
42. Nf6 Nc8?
this mistake makes things easier, although Black’s position was desperate anyway. More stubborn was 42… Bd7 though after 43. Nxd7 Nxd7 44. Ra5 and White winning two pawns after Bxb5-Bxa4
43. Ra8! and now White will win a piece by force 43…Bd7 44. Nxd7 1-0
Black resigned in view of 44…Kxd7 45.Bg4 +-


Overall, it was a great positional win by Liang Awonder, I am sure he knew the structure granted him a substantial strategic advantage in the ending, and this is why he was eager to trade queens early in the game. His better understanding of the structure allowed him to obtain a relatively easy, and very instructive victory.


Feel free to leave comments, suggestions or questions. If you liked this blog, become a follower, I try to publish at least two instructive articles per month.

Structures in Practice – The Catalan Gambit

Throughout the past month I have had much trouble choosing the topic of my next post. Maybe I haven’t followed enough recent games, or maybe there haven’t been many that caught my eye. Finally, I decided to share a game from my own experience, related to a structure I do not discuss in my book, but is nevertheless relevant: the Catalan Gambit, where White doesn’t recapture on c4. I actually sacrificed the c4-pawn not because I wanted to, but because it seemed to be the only chance to fight for an advantage. The resulting position is probably a dynamic balance, where White’s hope is to achieve a kingside or central attack before Black obtains some strong queenside play with the extra pawn.

1. d4 g6 2. c4 Bg7 3. Nf3 d6 4. g3 Nf6 5.Bg2 O-O 6. O-O c6 7. Nc3 Qa5 8. h3 I had prepared this line extensively, but then my opponent chose to move away from the main line with 8…Qa6!? Instead, I had prepared 8… e5 

9. Nd2!? Moving away from the usual lines, mostly due to my ignorance. The main line is 9.b3

9… Be6 10. Qb3 My goal was to support c4, preparing e2-e4 in the next move, with a strong control of the center. The alternative I considered was 10. d5 but after 10…Bc8 I believe Black has good counterplay, as I am somewhat overextended, for example 11. e4 Nbd7 12. Re1 Nc5 13. Bf1 Qb6 14. Rb1 a5 with good play.

10… d5! Black’s centra reaction is timely and precise

11. e4!? I found this interesting option, which is probably my only ambitious try in the position. It is not a very good idea to take the pawn with 11. cxd5 cxd5 12. Nxd5?! Nxd5 13. Bxd5 Bxd5 14. Qxd5 Nc6 15. e3 e5! where Black has more than enough compensation for the pawn. Also, in case of 11. c5 b6 12. cxb6, axb6 Black’s structure is preferable 

11… dxc4 Black should have considered 11… dxe4! and after 12. d5 Bf5 13. Ndxe4 Nxe4 14. Nxe4 Nd7 15. Be3 the position is equal.

12. Qc2 White has an interesting compensation for the pawn, since Black’s queen is misplaced on a6. 

12…Nbd7 Black needs to play 12… b5!? sooner or later in order to create counterplay. 13. Nf3 Qc8 14. Ng5 Na6 and the position is unclear.
13.Nf3 Rfd8 14. Ng5 Nf8 15. Be3
and White is a little better. Black’s plan has been rather slow, and now White counts with a dynamical advantage due to his nice control of the center

15…Ne8 Making White’s task easier. Black should have played 15… b5 16.f4 Qb7 17. f5!? where White has some initiative 16. Rfd1 Bd7?! Black still had time to seek counterplay with 16… b5! 17. a4 Black’s position now becomes unpleasant, as White dominates both sides of the board, and counterplay with b7-b5 is now much harder to carry out

17…b6 18. f4 Qc8 19. g4 Nc7 20. f5! White has a big advantage. The latter move creates contact with Black’s kingside, and it also has the virtue of keeping both of Black’s knights out of the game 

20…f6 An interesting variation was 20… b5 21. axb5 cxb5 22. e5 Rb8 23. Rxa7 b4 24.Rxc7! inviting Black into a mate in 3 with 24…Qxc7 25. Nd5 Qa7 26. Nxe7+ Kh8 27. Nxf7# 21. Nf3 Black reacted adequately, challenging the strong f5-pawn with e6! 22. Nh4! It is very important for White to maintain the strong f5-pawn where it is, as it creates many obstacles to Black’s defence, and it prevents Black’s bishop on g7 from playing 22…Re8 In case of 22… gxf5 23. gxf5 exf5 24. exf5 Be8 25. Kh1+- White’s kingside attack will be decisive 23. Qf2 a6 24. Rf1 White could already gain some material with 24. d5!  24… Qd8 25. Rad1!? Preparing the central break. I missed
the more direct 25. d5! winning a lot of material by force, for example 25…cxd5 26. exd5 exd5 27. Bxb6 Bc6 28. Qc5 Qd7 29. Bxc7+- 

25… exf5 26. gxf5 b5 27. e5 g5 In case of 27… fxe5 28. f6 Bxf6 29. Qxf6 Qxf6 30. Rxf6 White’s extra piece should be enough to win 28. e6! Keeping Black’s bishop on g7 locked out of the game. In case of 28. Nf3? Bxf5 29. Nxg5 Bd3 30. exf6 Qxf6! Black is still in big problems, but at least there is counterplay now, and pieces are somehow playing 

28… Nfxe6! a good practical chance from Black. In case of 28… gxh4?! 29. d5! Black’s position is desperate:

I think this diagram fully illustrates White’s potential in this structure. For example Nxd5 30. Nxd5 Bxe6 31. Nb6 Bd7 32. Bc5 Ra7 33. Bxc6 +- winning a lot of material. 29. fxe6 I missed the strong alternative 29. d5! cxd5 30.fxe6 Bxe6 31. axb5 gxh4 32. b6 Nb5 33. Nxd5+- 29… Bxe6 30. d5! It seems to be the only option to keep the advantage. Keeping the lines open at the cost of a pawn. But not 30. Nf3? Nd5 where Black manages to estabilize his position 

30… Nxd5. It does not help 30… cxd5 31. axb5! winning as above. Meanwhile 30… Bxd5 31. Nf5 is winning due to Black’s poor coordination, for example 31…Qd7 32. Nxd5 Nxd5 33. Nxg7 Qxg7 34. Rxd5 $1 cxd5 35. Bxd5+ Kh8 36. Bd4+- 

31. Nxd5 Bxd5 32. Nf5 +- In spite of the relatively equal material (four pawns for a piece) White is winning due to his coordination and the terribly passive bishop on g7 32…Re6 33. Bxg5! Qf8 The bishop is untouchable: 33…fxg5 34. Nxg7 Kxg7 35. Bxd5 cxd5 36. Qf7+ Kh8 37. Qxe6+- 

34. Bxd5 In case of 34.Nxg7 $6 Qxg7 35. Rxd5 fxg5 36. Rf5, where White is still winning, but it’s just not as easy as the game 

34… cxd5 35. Be3 now the g7-bishop is terribly placed 

35…Rd8 36. Kh1 clearing the g-file in order to attack the bishop on g7 36…Rd7 37. Rg1 Qe8 38. Bh6 Qh5 39. Nxg7 Qxh3+ 40. Qh2 Qxh2+ 41. Kxh2

With two extra pieces, for just a handful of pawns, the rest of the game is simple 41…Re2+ 42. Kh3 Kf7 43. Nf5 bxa4 44. Nd4 Re4 45. Rg7+ Ke8 46. Rg8+ Kf7 47. Rf8+ Ke7 48.Rh8 Kd6 49. Rc8 Rb7 50. Rc6+ Kd7 51. Rxf6 Rxb2 52. Rxa6 c3 53. Rg1 Rb7 54. Rxa4 Kd6 55. Bf8+ Ke5 56. Nc6+ Kf4 57. Bh6+ Kf5 58. Rg5+ Ke6 59. Rxe4+ dxe4 60. Rc5 Rb6 61. Bf4 e3 62. Nd4+ 1-0 Black resigned as all the pawns are falling. As a result of this game, I gained an important point toward my victory in the Montcada International Open of 2013. The game was very interesting tactically and strategically, but one thought I would like to leave all of you with is: Most of Black’s problems were a result of taking too long to mobilize the queenside. White’s control of the center is so strong that any attack is bound to work eventually, hence Black cannot just sit and wait. Seeking counterplay was needed.

Feel free to leave comments, suggestions or questions. If you liked this blog post, click “Follow” at the top of the page to receive an email once a new blog post is out. I will try to post at least twice a month.

Chess Structures in Practice – The Stonewall

I recently came across a very nice example of White’s winning strategy in the Stonewall structure (Chapter 6). After a relatively subtle opening mistake Black was forced to lose control of the c-file and lost the game without a fight.

Andreikin,D 2723 – Potapov,P 2471, TCh-RUS 2015

1. Nf3 f5 2. d4 Nf6 3. Bg5 e6 4. Nbd2 d5 5. e3 Be7 6. c4 c6 7. Bd3 O-O 8. O-O

Many games have reached this position, though in my opinion this is a somewhat inferior version of the Stonewall structure, since White’s bishops are very well placed on d3 and g5.

8…Nbd7?!  a very questionable move! The option 8… Bd7 seems more reasonable.

9. cxd5! Black is forced to take with the c-pawn, so after 9…cxd5 10. Rc1+/-

White already has a huge advantage, because he traded c-pawns and gained control of the c-file. Notice that Black’s knight is terribly placed on d7, if it were on c6 it would block the file for some time.

10…Nb6 11. Nb3 Na4 12. Qe2 Bd7 13. Bf4 Rc8 14. Ne5 a6?

This move only weakens the b6-square. A better defense was 14… Rxc1 15. Rxc1 Be8.

15. Rxc8 Bxc8 16. Rc1 Bd6 17. h3 Qe7 18. Qc2 Nb6 19. Nc5!

White creates pressure on the queenside, inviting Black to trade off some of the key defending pieces, like the bishop on d6.

19…Bxe5 in case of 19… Ne4!?  20. f3 Nf6 21. Bg5 White preserves a big edge, and ideas like Qb3 are available.

20. Bxe5 Nbd7 21. Bf4 Nxc5 22. Qxc5 Qxc5 23. Rxc5 

White has traded all the key defending pieces and now Black’s position is hopeless because he does not have any realistic chances of counterplay.

23…Nd7 24. Rc3 Nb6 25. Kf1 Na4 26. Rc2 Nb6 27. b3! preparing an expansion with a2-a4-a5.

27…Na8 this move is a very sad necessity, to prevent White’s rook from entering the 7th-rank. In case of 27… Nd7 28. Rc7 Rd8 29. a4 White is nearly winning.

28. a4! Aiming to play a4-a5 to keep the knight out of the game 28…b6 

The alternative was 28… a5 29. Rc5 b6 30. Rc6 Bd7 31. Rd6 Bc8 32. g4 !?. White has a clear advantage.

 29. b4 Bb7 30. b5!+-  a5 

In case of 30… axb5 31. axb5 does not help Black at all. White will continue in a similar way as the game, only that now he also has the idea Ra2-Ra7

31. g4! claiming space on the kingside is the right approach to win the game. White aims to create a second weakness.

31…g6 32. Kg2 Kf7 33. Kg3 Rh8 34. Be5 Rg8 35. h4 Bc8

In case of 35… fxg4 36. Kxg4  (threatening Kg5-Kh6 and winning) 36…h6 37. Bf4! Kg7 38. h5! opens the position decisively, say after 38…g5 39. Be5+ Kf7 40. f4 gxf4+ 41. Bg6+ Ke7 42. Bxf4 Rh8 43. Rf2+-

36. f3 Bb7 37. Kf4 threatening the Kg5-h6 invasion.  37…h6 38. h5! making use of the weakening move h7-h6.

38… g5+ 39. Kg3 Bc8 It does not help 39… fxg4 40. fxg4 Ke7 41. Rf2 +-

40. Rc6 Bd7 or 40… fxg4 41. Bg6+ Ke7 42. fxg4 Bd7 43. Rc2 followed by Rf2 winning.

41. Rd6 Ke7 42. gxf5 Black resigned as his position has collapsed.

Final Remarks

  • This game is yet another example of White’s dominance once the c-pawns have been traded, and the c-file is accessible.
  • Ten moves were enough for White to secure an enduring positional advantage, and the rest of the game is just a visually pleasing positional massacre.

Feel free to leave comments, suggestions or questions. If you liked this blog post, click “Follow” at the top of the page to receive an email once a new blog post is out. I will try to post once per week.

Chess Structures in Practice – The Closed Ruy Lopez

The following game is one of many interesting examples I had to leave out of my book simply because of space limitations. Anyway, watching over the games of the Women’s World Championship reminded me of this game, and I thought I should show it to you.

Karpov – Unzicker, Milan 1975

1. e4 e5 2. Nf3 Nc6 3. Bb5 a6 4. Ba4 Nf6 5. O-O Be7 6.Re1 b5 7. Bb3 d6 8. c3 O-O 9. h3 Na5 10. Bc2 c5 11. d4
We have started with a Lopez Formation, in what’s arguably one of the oldest and most studied lines in opening theory. Black can capture …cxd4 possibly transforming the game into a King’s Indian type I, or White could push d4-d5 to turn the game into a Closed Ruy Lopez.

11…Qc7 12. Nbd2 Bd7

One of the most theoretical lines begins with 12… cxd4 13. cxd4 Nc6 14. Nb3 a5 15. Be3 a4 16. Nbd2 where the game is likely to transpose to a King’s Indian type I structure, after White’s d4-d5. Something positive about Black’s position after d4-d5 though, is the fact that the bishop on e7 can reach an active position within only two moves, by playing Bc7-Bb6 (or a5).

13. Nf1 Rfe8 14. d5!

White transforms the structure under good circumstances, as we will see later in the game, Black’s pieces are already poorly arranged for what’s coming up. The position we have resembles the Kings Indian type II (only difference is the pawn on c3 rather than c4). One of Black’s standard plans is f7-f5, though here it is not working as well since the rook is on e8, and the pawn is still on g7 (we need it on g6)

13…Nb7 15. N3h2 g6
In case of 15… c4 16. f4 exf4 17. Bxf4 Black’s knight on f6 is not so weak, but White still enjoys an edge after 17…Nc5 18. Nf3 a5 19. e5!? with a small edge

16. Ng3 c4 17. f4!

An excellent transformation of the position

17…exf4
Unzicker was more or less forced to capture on f4, since he is otherwise lacking a productive plan, for example 17… a5 18. Rf1 b4 19. Be3 Rab8 20.Qd2 with a small edge. White will double the rooks on the f-file, and it seems Black will eventually have to capture on f4 either way.

18. Bxf4

We have reached position of interest. White has carried out a standard transformation of the Closed Ruy Lopez, in order to open lines for attack. One might think the backward pawn on e4, or the e5 square could be a problem to White in this position, but in reality White enjoys a very pleasing advantage since Black lacks the time to arrange his pieces properly. If Black could swap his bishop on b7 and bishop on d7, and move his bishop from e7 to g7, the situation would be very different.

18…Bf8 19. Bg5! this well timed move prevents Black from reorganizing his forces 19…Be7

Black does not have time to rearrange his bishop with 19… Bg7? due to 20. Rf1 Qd8 (or 20… Nh5 21. Nxh5 gxh5 22. Qxh5+-) 21. Qf3+-

20. Qd2 Bc8

A more stubborn defence was 20… Qd8 threatening …Nxd5, though after 21. Be3! Black is helpless, for example Bf8 22. Rf1 Bg7 23. Bg5 with a big advantage for White

21. Rf1 Nd7 22. Ng4 1-0

Black resigned in view of White’s unstoppable threats. Probably a couple extra moves could have been played, though the outcome of the game is completely clear. If Black had continued with 22…Nd8 (it does not help 22… Bf8 23. Qf4+-) 23. Bxe7 Rxe7 24. Qg5! finishes off the game, since Re8 is met by 25. Nh5 +-

Final remarks:

  • From a purely structural point of view, the break f2-f4 is not so good, since it weakens the e4-pawn as well as the e5 square and the dark-squares in general. What makes this break so typical in this structure, and so strong, is the fact that White gains chances for a kingside attack, and since there are so many pieces on the board, Black’s lack of space often prevents him from taking advantage of the e5 square in an ideal manner.
  • The key aspect of this game is that the break f2-f4 worked ideally because Black’s pieces were arranged in a suboptimal way (possibly Black was not expecting f2-f4 at all). This poor arrangement prevented Black from organizing a defence on time.

To play through the game, click the link: Game Link.

The Decisive Game of the Women’s World Championship

At this point you might be wondering why did I connect the game Karpov-Unzicker with the Women’s World Championship. Well, it turns out that the decisive game of the final match, between Mariya Muzychuk and Natalija Pogonina was decided on the same pawn structure! The game was the second round of the match, where Muzychuk had the White pieces. The  critical position of the game was:

Black’s strategy has given good results so far, and the control of the dark-squares should give Black a small advantage. Now Black should have played 27…g5! 28 Qe2 Bxg3 29.Kxg3 Ng6 with an excellent control of important dark squares such as f4. As we can see in the resulting position:
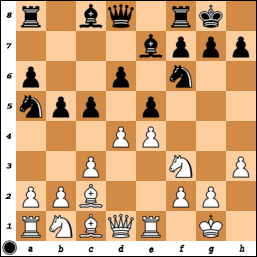
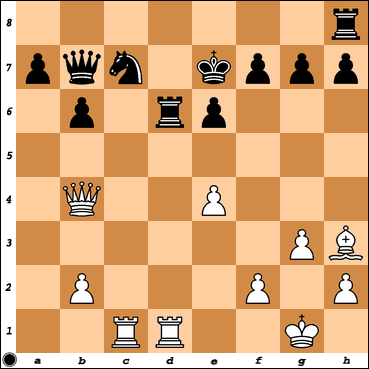
Black has great prospects of kingside play after …Kg7 and the …h7-h5 break. Instead Black played 27…Bg5?, and after 28.f4! exf4 29.Bxf4 we obtained the position:

where White’s position is not nearly as good as it was in Karpov-Unzicker, (Pogonina has played better than Unzicker did) but at least many of the earlier ideas still apply. In particular, it is hard for Black to make anything out of the e5-square, and the “weakness” of the backward e4-pawn is non-existent. Mariya Muzychuk managed to slowly make progress in the position, gain control of Black’s weakened dark-squares, and never allow Black to control the e5-square with a knight. Eventually the game reached the position:

where White enjoys a great advantage. In this position Pogonina gave in to pressure by playing 45…b4 (which gives up a pawn), and she eventually lost the game. I believe this game was an excellent illustration of how classical concepts are applied in today’s practice. You should keep in mind though that current games often show great improvement over classics. Karpov’s win is certainly more appealing than Muzychuk’s, but Pogonina’s defence was also much better than Unzicker’s. Either way, if there is something to take away from these two examples is the power of the f2-f4 break.

Feel free to leave comments, suggestions or questions. If you liked this blog post, click “Follow” at the top of the page to receive an email once a new blogpost is out. I will try to post once per week.


Chess Structures in Practice – CaroKann Formation

Leer Articulo en Español

Beginning of English Post – Comienza Post en Ingles

Just like many of you, I spent a fair amount of time last week following the US Chess Championship played in St Louis. There was plenty of excitement, the live broadcast was very good and more important than anything, the tournament featured what was arguably the strongest combination of twelve players to ever compete in the US Championship. Despite having plenty of nice games to choose from, I think that the game I will show next was the nicest illustration of concepts from Chess Structures put into practice.

Alexander Onischuk(2655) – Daniel Naroditsky(2633), US Chess Championship 2015

1. d4 Nf6 2. c4 e6 3. g3 d5 4. Nf3 Bb4+ 5. Bd2 Bd6 6. Bg2 c6

The move order 6…0-0 7.0-0 Nbd7 8.Qc2 and only now 8…c6 seems to be more precise, making it harder for White to take control of the center.

 7. Nc3 O-O 8. Bg5! Nbd7 while 8…dxc4 was met by 9.Nd2 followed by 10.Nxc4 9. e4 dxe4 10. Nxe4 10…Bb4+ 11. Nc3!

In case of 11.Bd2? Bxd2 12.Nexd2 e5! and Black equalizes.

We have reached the CaroKann Formation (Chapter 3), where White has more space and a better control of the center. The assessment of this position depends almost exclusively on whether Black can find a way to break in the center to release his spatial disadvantage. Otherwise, White will enjoy a lasting positional edge.

11…h6  getting rid of the pin, aiming to create some counterplay with …Ne4

It seems Black did not have better options, for example 11…c5 12. 0-0 cxd4 13. Qxd4 where White has superior coordination. Also 11…Qa5 12.Bd2 e5 is met by 13.a3! Bxc3 14.Bxc3 Qa6 15 0-0! with a big advantage.

12. Bf4 Ne4 13. Qc2 Nxc3 14. bxc3 Ba5 15. O-O

This is a good moment to evaluate the position. The structure has changed slightly since White now has doubled c pawns (which also means he has a semi-open b-file. Black has been unable to release his position with either …c6-c5 or …e6-e5 and having his bishop trapped on c8 only adds to his misery. White has a very comfortable advantage.

15…Bc7 trading pieces is good, but this also gives up control of dark squares, which is not so good… 16. Qe4 Bxf4 17. Qxf4 b6 18. Rfd1 Bb7 19. c5! A thematic move in this structure, locking Black’s bishop.

19…Rc8 20. Rab1 Ba8 21. Ne5! Onischuk knows his advantage comes from his strong bishop on g2 versus the poor bishop on a8. Knights are only accessory pieces hence can be traded, 21…Qe7 22. Nxd7 Qxd7 23. a4!

Notice how White does not capture Black’s pawn on b6, since this would release the bishop on a8. 23…Rfd8 24. Bf3 Qe7 attacking the c5 pawn, hoping White will finally take on b6 allowing Black to liberate his position.

White’s also much better after 24… bxc5 25. dxc5 Qe7 26.Rd6.

25. Qe5! bxc5 26. Qxc5 Qc7? too passive, keeping queens on the board will not help Black

In case of 26… Qxc5 27. dxc5 Kf8 28. a5 Ke7 29. a6 Black’s bishop is trapped on a8, but his chances of holding are better than in the game since White does not have entry points at the moment.

27. a5  White can improve slowly, a typical feature of this pawn structure when White’s central domination works out.

27…Rb8 28. c4 Qd7 29. h4 Rbc8 30. Kg2 Rc7 31.Rb3 Qc8 Black’s position continues to deteriorate, how should White proceed in the creation of new weaknesses?

32. g4! White’s central domination allows for a risk-free kingside expansion 32…Rcd7 33. g5 hxg5 34. hxg5 Qc7 35. Re3 Qd6 36. Qxd6 Rxd6

37. c5! Rxd4 38. Rxd4 Rxd4 39. Rb3 Rd8 40. a6! Kf8 41. Be4 White has a rather picturesque position, he is a pawn down but has a great advantage due to the permanently trapped bishop on a8; Black’s position is critical.

41…f5? the decisive mistake

More solid was was 41… Ke7 though after 42.f4 White will improve slowly and win, as an example take 42…Rd2 43.Kf3 Rd8 44.f5 e5 45 Rd3 Rh8 46 Rd6, to follow with f5-f6 with a great advantage.

42. gxf6 gxf6 43. Rh3?! even stronger was the direct 43. Rd3! winning similar to the game 43… Kg8

More stubborn was 43… Rd4!, though after the precise forced sequence 44. Rh8+ Kg7 45. Rh7+ 45… Kg8 46. Bg6!1 Rg4+ 47. Kf3 Rxg6 48. Rxa7 Rg1 49. Rxa8+ Kg7 50. Rc8 Ra1 51. Rxc6 White is winning without problems

44. Rd3! Rxd3 45. Bxd3

Black is completely hopeless because he is essentially playing without a bishop, and will be unable to prevent White from penetrating decisively on the center/kingside.

45…f5 46. f4 Kg7 47. Kf3 Kf6 48. Ke3 e5 49. Bc4 e4 50. Kd4 1-0 White’s king is coming into e5 to decide the game and Black decided it was time to resign.

Interestingly enough, Black could still try one last trick, which is 50…Kg6 51. Be6 Kf6 52. Bc8 Ke7 53. Bb7?? 53… Kd7! and the game is draw after  54. Bxa8 Kc7 where White cannot make progress. Of course, White was winning easily with either 51. Ke5 or 53. Bxf5.

Final Remarks

  • It is hard to pinpoint exactly where things went so wrong for Black. After a slightly imprecise opening White was simply better for the rest of the game. The crucial point though is that Black did not find a way to carry out the standard central breaks.
  • Once again, similar to example Ivanisevic – Ascic (Chapter 3) the idea c4-c5 proved very effective at restricting Black’s bishop on c8, securing a lasting advantage for White.

Feel free to leave comments, suggestions or questions. If you liked this blog post, click “Follow” at the top of the page to receive an email once a new blogpost is out. I will try to post once per week.

Game Link

End of English Post – Comienza Post en Español

Screen Shot 2015-04-10 at 10.36.53 PM

Chess Structures en Practice – Estructura CaroKann

Read article in English

Tal y como muchos de ustedes, me pase una buena parte de la semana pasada siguiendo las partidas del Campeonato de Estados Unidos, jugado en la ciudad de Saint Louis. Hubieron muchas partidas emocionantes, la transmision en directo fue muy buena, y mas importante que todo, el torneo tuvo una combinacion de 12 jugadores muy fuertes, posiblemente el torneo de EEUU mas fuerte que se ha visto hasta el momento. A pesar de que hubieron muchas partidas interesantes para escoger, creo que la partida siguiente es por lejos el mejor ejemplo de como los conceptos de Chess Structures se ponen en la practica.

Alexander Onischuk(2655) – Daniel Naroditsky(2633), US Chess Championship 2015

1. d4 Nf6 2. c4 e6 3. g3 d5 4. Nf3 Bb4+ 5. Bd2 Bd6 6. Bg2 c6

El orden 6…0-0 7.0-0 Nbd7 8.Qc2 y solo ahora8…c6 parece ser mas preciso, impidiendo que las blancas se apoderen del centro con tanta facilidad.

 7. Nc3 O-O 8. Bg5! Nbd7 mientras que 8…dxc4 se responde con 9.Nd2 seguido de 10.Nxc4 9. e4 dxe4 10. Nxe4 10…Bb4+ 11. Nc3!

En caso de 11.Bd2? Bxd2 12.Nexd2 e5! y las negras igualan.

Hemos llegado a la formacion CaroKann (Capitulo 3), donde las blancas tienen mas espacio y un mejor control del centro. La evaluacion de esta posicion depende casi exclusivamente de si acaso las negras son capaces de romper en el centro liberando su posicion. De no ser asi, el blanco tendra una ventaja duradera.

11…h6  deshaciendose de la clavada, con tal de crear contrajuego con …Ne4

Parece que las negras no tienen mejores opciones, por ejemplo 11…c5 12. 0-0 cxd4 13. Qxd4 donde las blancas tienen una coordinacion superior. También 11…Qa5 12.Bd2 e5, se responde con 13.a3! Bxc3 14.Bxc3 Qa6 15 0-0! con gran ventaja.

12. Bf4 Ne4 13. Qc2 Nxc3 14. bxc3 Ba5 15. O-O

Este es un buen momento para evaluar la posicion. La estructura ha cambiado un poco dado que ahora las blancas tienen peones doblados en la columna c, lo cual tambien implica que tienen una columna b semiabierta. El negro ha sido incapaz de liberarse con …c6-c5 o …e6-e5 y tener su alfil atrapado en c8 solo empeora las cosas. Las blancas tienen una ventaja comoda.

15…Bc7 cambiando pieces lo cual es bueno, pero tambien perdiendo control sobre las casillas oscuras, lo cual no es tan bueno…16. Qe4 Bxf4 17. Qxf4 b6 18. Rfd1 Bb7 19. c5! Una jugada tematica en la estructura, restringiendo el alfil de c8.

19…Rc8 20. Rab1 Ba8 21. Ne5! Onischuk sabe que su ventaja radica en la diferencia de los alfiles, su alfil en g2 es bueno y el alfil en a8 es malo. Los caballos solo son piezas accesorias y se pueden intercambiar, 21…Qe7 22. Nxd7 Qxd7 23. a4!

Notese como las blancas no capturan el peon de b6, dado que esto liberaria el alfil de a8. 23…Rfd8 24. Bf3 Qe7 atacando el peon de c5, con la esperanza que el blanco finalmente capture en b6 liberando la posicion negra.

Las blancas tambien estan mucho mejor despues de 24… bxc5 25. dxc5 Qe7 26.Rd6.

25. Qe5! bxc5 26. Qxc5 Qc7? muy pasivo, mantener las damas no ayuda al negro.

En caso de 26… Qxc5 27. dxc5 Kf8 28. a5 Ke7 29. a6 el alfil negro esta atrapado, pero sus chances de defenderse son mejores que en la partida dado que el blanco tiene menos puntos de entrada.

27. a5  Las blancas pueden mejorar lentamente, una caracteristica tipica de la estructura cuando la estrategia de dominacion blanca da resultados.

27…Rb8 28. c4 Qd7 29. h4 Rbc8 30. Kg2 Rc7 31.Rb3 Qc8 La posicion negra continua deteriorandose, como deben proceder las blancas para crear nuevas debilidades?

32. g4! La dominacion central blanca le permite expandise en el flanco de rey sin riesgos 32…Rcd7 33. g5 hxg5 34. hxg5 Qc7 35. Re3 Qd6 36. Qxd6 Rxd6

37. c5! Rxd4 38. Rxd4 Rxd4 39. Rb3 Rd8 40. a6! Kf8 41. Be4 El blanco tiene una posicion visualmente agradable, tiene un peon de menos pero el alfil negro esta completamente atrapado en a8, dandole una gran ventaja. La posicion negra es critica.

41…f5? el error decisivo.

Mas solida era 41… Ke7 aunque despues de 42.f4 el blanco puede mejorar lentamente hasta ganar, por ejemplo 42…Rd2 43.Kf3 Rd8 44.f5 e5 45 Rd3 Rh8 46 Rd6, to follow with f5-f6 con gran ventaja.

42. gxf6 gxf6 43. Rh3?! aun mejor era la directa 43. Rd3! similar a la partida 43… Kg8 

Mejor defensa era 43… Rd4!, aunque despues de la sequencia forzada 44. Rh8+ Kg7 45. Rh7+ 45… Kg8 46. Bg6!1 Rg4+ 47. Kf3 Rxg6 48. Rxa7 Rg1 49. Rxa8+ Kg7 50. Rc8 Ra1 51. Rxc6 el blanco gana sin problemas.

44. Rd3! Rxd3 45. Bxd3

El negro esta completamente perdido, dado que esta jugando con alfil de menos y no se pueden bloquear todas las entradas del rey blanco.

45…f5 46. f4 Kg7 47. Kf3 Kf6 48. Ke3 e5 49. Bc4 e4 50. Kd4 1-0 El rey blanco entra en e5 en forma decisiva y el negro decidio rendirse.

Es curioso que en esta posicion el negro todavia tenia un ultimo truco para probar, que era 50…Kg6 51. Be6 Kf6 52. Bc8 Ke7 53. Bb7?? 53… Kd7! y la partida es tablas despues de  54. Bxa8 Kc7 dado que el blanco no puede progresar. Por supuesto el blanco ganaba facil despues de 51. Ke5 o 53. Bxf5.

Comentarios Finales

  • Es dificil señalar exactamente donde fue que las negras arruinaron su posicion. Despues de una pequeña imprecision en la apertura el blanco simplemente quedo mejor para el resto de la partida. El punto clave fue que el negro no fue capaz de liberarse con los golpes estandard.
  • Una vez mas, tal y como ocurre en el ejemplo Ivanisevic – Ascic (Chapter 3) la idea c4-c5 provo ser efectiva para el blanco, al restringir el alfil negro en forma decisiva.

Sientase en la libertad de dejar comentarios, sugerencias o preguntas. Si le gusto este post, cliquee en donde dice “Follow”, y le llegara un email de vez en cuando, cada vez que publique un articulo nuevo.

Link al visor de partida

My Motivation – Lack of Comprehension

Leer Articulo en Español

Beginning of English Post – Comienza Post en Ingles

In this post I decided to show one of the many painful defeats I suffered when I was younger. I was very good in tactics, but I was often unable to evaluate positions correctly, and this game is an example. I lost this game in a purely strategic fashion, but without ever understanding why or when I got such a bad position. My primary motivation in writing Chess Structures was giving precise and contextualized advice, so that readers will know which positional features make up a good position in a given structure. This game was played in 2004, at the World Youth Chess Championship in Greece. I was unrated at the time, though my strength was about 2000, my oponent was rated 2061. You will find many mistakes from both sides, but the important part here is sharing the logic I followed, illustrating how strategy without a context is dangerous.

Let’s see the game:

George Kanakaris – Mauricio Flores, WYCC u-14 Heraklion, Greece, 2004

1. d4 Nf6 2. c4 g6 3. Nc3 Bg7 4. e4 d6 5. f3

I immediately thought “he will castle long, attack on the kingside, and I will attack on the queenside.”

5…O-O 6. Bg5 c6

6… c5 is healthier, and after 7. d5 h6 8.Be3 e6 9. Qd2 exd5 10. cxd5 h5 Black has a good asymmetric Benoni structure (Chapter 12). Had I been more familiar with the structure, I would have known better and choosen this line instead

7. Nge2 e5 8. d5 h6 9. Be3

9…cxd5?!

Since I was convinced my opponent would attack on the kingside, I thought “opening the c-file can only help me.” The alternative 9… c5 10. Qd2 h5 yields an interesting game, though White has a favorable version of the King’s Indian type II (Chapter 15), since he is creating threats more quickly, for example 11. Nc1 Nh7 12. Nd3 f5 13. Be2 f4?! premature (or 13… Qe7 14. a3 Nd7 15. b4!? +=) 14. Bf2 g5 15. O-O-O! followed by Rdg1, g2-g3 and h2-h4 with good kingside play

10. cxd5 a6 11. Qd2 Kh7 12. Na4?!

A strange decision… Better was 12. g4 Nbd7 13. Ng3 similar to the game, but with two extra moves

12… Nbd7 13. g4 b5 14. Nac3 Nb6

When I got to this position I was thrilled, my opponent had wasted two moves and I felt that we were in some kind of opposite flanks race where I had the edge. In reality, pushing b7-b5 had also created some weaknesses (the c6-square) and I was heading in the wrong direction entirely

15. Ng3 Nfd7 16. Qf2

correct was 16. h4! similar to the game

16… Bb7 better was 16… Bf6! to prevent h2-h4 17. h4 Rc8 18. h5 g5?

Anything would have been better than locking the kingside, for example this pawn sacrifice: 18… Kg8 19. hxg6 (19. Rc1!? +=) 19… fxg6 20. Bxh6 Bxh6 21. Rxh6 Qg5 where Black has excellent compensation. Of course, taking the h6-pawn was a bad idea

19. Nf5

I am embarrassed to admit that I was actually happy with this position. Let me break down my
thoughts in 2004, compared to my thoughts in 2015.

My thoughts in 2004

  • The pawn structure is symmetrical
  • My opponent has a strong f5 square, but I can
    just trade the knight if I really want to
  • My opponent has more space on
    the kingside, I have more space on the queenside
  • Since the kingside is closed and the queenside is not, I must be the one fighting for an edge
  • I already have a rook on the open file, which favors me even more.
  • Overall, the position is somewhat better for Black.

My thoughts in 2015:

  • While the pawn structure is kind of symmetrical, my opponent has a crucial space advantage due to the d5 pawn versus my d6 pawn
  • The knight on f5 is a monster, and trading it for my light squared bishop would only increase my weakness on light squares.
  • My queenside pawns are a liability, not a strength
  • White will easily turn his attention to the queenside and play for a win there
  • Even though Black does control the c-file momentarily, the lack of entry points will gradually make Black lose control of the file.
  • Overall, White has a decisive positional advantage, winning should just be a matter of technique.

We have a King’s Indian type I structure, where (as explained in Chapter 14) Black’s chances are mostly based on a kingside attack with f7-f5. Since Black is no longer able to do anything on the kingside, this pessimistic prognosis only makes sense, but unfortunately I had no idea about this back in 2004…

19…Nc5 20. Rc1 Re8 21. Be2 Bf8 22. O-O b4?!

I thought I was “expanding”. In reality all I am doing in weakening the c4-square. In case of 22…Ncd7 23. b3 Black simply does not have useful moves, while White’s play is making substantial progress.

23. Nb1 Nbd7 24. Nd2 Na4 25. Nc4 

White has a decisive advantage. Only at this point it become very clear to me that something was wrong… Over the past 5 moves I had spent about an hour calculating and finding nothing, and now White begins making serious threats on what I thought was my flank.

25…Ndc5 26.Bd2

It becomes clear that Black has serious problems, such as the weak pawns on b4 and d6, and the weak connected squares on c4, a5 and c6.

26…b3 27. a3?

Better was 27. Ra1! winning a piece after 27…bxa2 28. Rxa2 Rb8 29. b4

27… Qc7 28. Ba5 Qb8 29. Qe3 Ba8 30. Kg2 Nb7 31. Qxb3 Nxa5 32.
Qxa4 Nxc4 33. Bxc4 Qxb2+ 34. Rc2 Qb6

As you can verify, my opponent has missed some strong moves and I managed to survive, but the structure has not changed, and I am still lost…

35. Rfc1 Bb7 36. Be2 Rxc2 37. Rxc2? missing yet another win… 37. Qxe8! Rxe2+ 38. Kh3 followed by 39.Qxf7 wins on the spot 37… Rd8 38. Qb4! Qxb4 39. axb4 


the weakness of the a6-pawn will now decide the game.

Rc8 40. Ra2 40… Ra8 41. Ne3 Bc8 42. b5! +-

White finally finds a way to capitalize his major positional advantage, and the rest was easy:

42…a5 43. Nc4 a4 44. Nb6 Rb8 45. Nxc8 Rxc8 46. Rxa4

46…Kg7 47. Ra7 Kf6 48. Rd7 Rb8 49. Kf2 Be7 50. Ke3 Rd8 51. Rb7 Ra8 52. Rd7 Rd8 53. Rc7
Rb8 54. Rc6 Kg7 55. Kd2 Kf8 56. Kc3 Ke8 57. Kc4 Kd7 58. b6 Ra8 59. Kb5 Bd8 60.
Bd1 Ra1 61. Ba4 Rb1+ 62. Ka6 Ra1 63. Rc7# 1-0

Final remarks:

  • Black’s biggest mistake was going into a KID structure type I, and not pursuing the primary plan …f7-f5 followed by kingside play.
  • Black’s position around move 19 seemed to indicate there were some chances of queenside play, but similar to the game Carlsen-Hammer from Chapter 14, the lack of entry points prevents Black from achieving anything.
  • I believe I was somewhat more alert than my opponent when it came to tactics, in fact I saw many of the winning moves he missed. It was his superior understanding of the structure what allowed him to defeat me with such ease.

Feel free to leave comments, suggestions or questions. If you liked this blog post, click “Follow” at the top of the page to receive an email once a new blogpost is out. I will try to post once per week.

Game Link,

End of English Post – Comienza Post en Español

Screen Shot 2015-04-10 at 10.36.53 PM

Mi motivacion – La falta de comprension

Read article in English

En este post decidi mostrar una de las tantas derrotas dolorosas por las que pase cuando era menor. Yo era muy bueno en tactica, pero me costaba mucho evaluar las posiciones correctamente, y este es un ejemplo. Perdi la partida estratégicamente sin nisiquiera haber entendido como, o en que momento fue que quede tan mal. Mi mayor motivación al escribir Chess Structures fue la de dar consejos precisos y contextualizados, para que los lectores pudieran identificar los patrones e ideas que conforman una buena posición dentro de cada estructura. Este partido fue jugado el 2004, en el Campeonato Mundial Juvenil en Grecia. Yo no tenia elo FIDE en ese entonces, y mi oponente tenia 2061. Como se podra dar cuenta, ambos cometimos varios errores, pero lo importante de esta partida es examinar la logica que yo segui, y de esta manera ilustrar como la estrategia sin contexto es peligrosa.

Veamos la partida:

George Kanakaris – Mauricio Flores, WYCC u-14 Heraklion, Greece, 2004

1. d4 Nf6 2. c4 g6 3. Nc3 Bg7 4. e4 d6 5. f3

Inmediatamente pense “Se va a enrocar largo, yo ataco por el flanco de dama y el por el flanco de rey.”

5…O-O 6. Bg5 c6

6… c5 es mas saludable, y despues de 7. d5 h6 8.Be3 e6 9. Qd2 exd5 10. cxd5 h5 el negro tiene una buena estructura Benoni asimetrica(Capitulo 12). Si hubiera estado mas familiarizado con esa estructura, hubiera jugado esta linea.

7. Nge2 e5 8. d5 h6 9. Be3

9…cxd5?!

Como estaba convencido que me iban a atacar en el flanco de rey, pense “abrir la columna c solo puede favorecerme” La alternativa 9… c5 10. Qd2 h5 resulta en un juego interesante, aunque las blancas tienen una version favorable de la India de Rey tipo II (Capitulo 15), dado que pueden crear amenazas mas rapido, por ejemplo 11. Nc1 Nh7 12. Nd3 f5 13. Be2 f4?! prematura (o 13… Qe7 14. a3 Nd7 15. b4!? +=) 14. Bf2 g5 15. O-O-O! seguido por Rdg1, g2-g3 y h2-h4 con buen juego en el flanco de rey.

10. cxd5 a6 11. Qd2 Kh7 12. Na4?!

Una decision extraña… Mejor era 12. g4 Nbd7 13. Ng3 similar a la partida, pero con dos jugadas extra.

12… Nbd7 13. g4 b5 14. Nac3 Nb6

Cuando llegue a esta posicion estaba emocionado, mi oponente habia gastado dos jugadas y yo pensaba que estabamos en una carrera de flancos opuestos donde yo llevaba la delantera. En realidad, el avanzar b7-b5 habia creado debilidades como la casilla c6, y yo iba en una direccion completamente incorrecta.

15. Ng3 Nfd7 16. Qf2

Lo correcto era 16. h4! similar a la partida.

16… Bb7 mejor era 16… Bf6! para prevenir h2-h4 17. h4 Rc8 18. h5 g5?

Cualquier cosa hubiera sido mejor que bloquear el flanco de rey, por ejemplo el sacrificio de peon: 18… Kg8 19. hxg6 (19. Rc1!? +=) 19… fxg6 20. Bxh6 Bxh6 21. Rxh6 Qg5 donde las negras tienen una compensacion excelente. Claro, capturar el peon de h6 no es buena idea.

19. Nf5

Me averguenza admitir que en estaba posicion yo en realidad estaba contento. A continuacion hago un contraste entre lo que pensaba en ese tiempo, y lo que opino hoy en dia.

Lo que pensaba el 2004

  • La estructura de peones es simetrica
  • Mi oponente tiene un caballo fuerte en f5, pero puedo cambiarlo por mi alfil de ser necesario
  • Mi oponente tiene mas espacio en el flanco de rey, yo tengo mas en el flanco de dama
  • Como el flanco de rey esta cerrado, y el flanco de dama no lo esta, solo yo puedo jugar por la ventaja
  • Ademas yo ya controlo la columna c
  • En resumen, el negro debe estar un poco mejor

Lo que opino el 2015:

  • La estructura de peones es un tanto simetrica, pero mi oponente tiene una ventaja de espacio crucial, debido al peon de d5 contra mi peon de d6.
  • El caballo de f5 es demasiado fuerte, y cambiarlo por mi alfil de casillas claras solo aumentaria mi debilidad en casillas claras como c6.
  • Mis peones del flanco dama son una debilidad, no una fortaleza.
  • Las blancas pueden facilmente cambiar su enfoque al flanco de dama
  • A pesar de que las negras controlan la columna c de momento, la falta de puntos de entrada gradualmente hara que las negras pierdan el control de la columna.
  • En resumen, las blancas tienen una ventaja posicional decisiva, y ganar es cosa de tecnica.

Tenemos una estructura India de Rey, tipo I, donde (como esta explicado en el Capitulo 14) las chances de las negras estan principalmente basadas en un ataque en el flanco de rey con f7-f5. Dado que las negras ya no pueden hacer nada en el flanco de rey, este pronostico tan pesimista tiene mucho sentido, pero desafortunadamente yo no tenia la mas minima idea de esto el 2004…

19…Nc5 20. Rc1 Re8 21. Be2 Bf8 22. O-O b4?!

Pensaba que me estaba “expandiendo”. En realidad todo lo que estoy haciendo es debilitar la casilla c4. En caso de 22…Ncd7 23. b3 las negras simplemente no tienen jugadas útiles, mientras que las blancas pueden progresar de forma sustancial.

23. Nb1 Nbd7 24. Nd2 Na4 25. Nc4 

Las blancas tienen una ventaja decisiva. Recien ahora me comence a dar cuenta que algo habia salido mal… Durante las ultimas 5 jugadas me habia gastado casi una hora calculando sin poder encontrar una variante satisfactoria, y ahora las blancas comienzan a crear amenazas en el flanco dama.

25…Ndc5 26.Bd2

Se vuelve claro que las negras tienen serios problemas, como los peones de b4 y d6, y las casillas conectadas de c4, a5 y c6.

26…b3 27. a3?

Era mejor 27. Ra1! ganando una pieza despues de 27…bxa2 28. Rxa2 Rb8 29. b4

27… Qc7 28. Ba5 Qb8 29. Qe3 Ba8 30. Kg2 Nb7 31. Qxb3 Nxa5 32.
Qxa4 Nxc4 33. Bxc4 Qxb2+ 34. Rc2 Qb6

Como se puede ver, mi oponente desperdicio muchas jugadas ganadoras, y hasta el momento he logrado sobrevivir, pero desafortunadamente la estructura no ha cambiado, asi que sigo estando perdido…

35. Rfc1 Bb7 36. Be2 Rxc2 37. Rxc2? desperdiciando otra oportunidad de ganar, 37. Qxe8! Rxe2+ 38. Kh3 seguido por 39.Qxf7 ganando de inmediato 37… Rd8 38. Qb4! Qxb4 39. axb4 


La debilidad de a6 ahora decida la partida.

Rc8 40. Ra2 40… Ra8 41. Ne3 Bc8 42. b5! +-

Las blancas finalmente encuentran una manera de capitalizar su ventaja posicional, y el resto es facil.

42…a5 43. Nc4 a4 44. Nb6 Rb8 45. Nxc8 Rxc8 46. Rxa4

46…Kg7 47. Ra7 Kf6 48. Rd7 Rb8 49. Kf2 Be7 50. Ke3 Rd8 51. Rb7 Ra8 52. Rd7 Rd8 53. Rc7
Rb8 54. Rc6 Kg7 55. Kd2 Kf8 56. Kc3 Ke8 57. Kc4 Kd7 58. b6 Ra8 59. Kb5 Bd8 60.
Bd1 Ra1 61. Ba4 Rb1+ 62. Ka6 Ra1 63. Rc7# 1-0

Comentarios Finales:

  • El mayor error negro fue entrar en esta estructura, y no ejecutar el plan principal …f7-f5 seguido por un ataque en el flanco de rey.
  • La posicion negra alrededor de la jugada 19 parecia indicar que existian chances de contrajuego en el flanco de dama, pero al igual que la partida Carlsen-Hammer del Capitulo 14, la falta de puntos de entrada impide que las negras puedan lograr nada.
  • Creo que en general yo estuve mas alerta a la tactica, y en varias ocasiones calcule las jugadas ganadoras que mi oponente omitio. El motivo por el que mi rival me derroto con tanta facilidad fue que el simplemente tenia un mejor conocimiento estrategico de la estructura que estabamos jugando.

Link a la partida,

Sientase en la libertad de dejar comentarios, sugerencias o preguntas. Si le gusto este post, cliquee en donde dice “Follow”, y le llegara un email de vez en cuando, cada vez que publique un articulo nuevo.